SSO Settings
Note
When you enter the SSO configuration, the unique identifier in the Name field is empty. The field is automatically populated with a unique identifier when you save the configuration for the first time. This identifier is used in the SSO URLs, so it is essential for the SSO process to function correctly.
Warning
The Admin Portal creates the SSO endpoints in up to 3 hours after saving the configuration. During this time, the SSO URLs will not be available, and you may encounter errors if you try to use them. Please allow some time for the SSO endpoints to be set up before testing your SSO configuration. All subsequent changes to the SSO configuration will take effect immediately, and there is no need to wait for the endpoints to be recreated.
The Single Sign-On configuration page is accessible from the User menu in the top right corner of the Admin Portal. To access it, click on your user avatar, then select “SSO Settings” from the dropdown menu.
The SSO configuration page will prompt you to enter the following information:
Name: The SSO configuration’s unique identifier.
Name ID Format: The format of the Name ID that will be used in the SSO process. The Admin Portal supports the following formats:
urn:oasis:names:tc:SAML:1.1:nameid-format:unspecified
urn:oasis:names:tc:SAML:1.1:nameid-format:emailAddress
urn:oasis:names:tc:SAML:2.0:nameid-format:persistent
urn:oasis:names:tc:SAML:2.0:nameid-format:transient
Tenant key: (Optional) The name of the claim that will be used to identify the tenant in the SSO process. This claim should contain the tenant’s unique identifier.
Role key: The name of the claim that will be used to identify the user’s role to assign appropriate permissions in to the user account.
Metadata contents: The SSO metadata content provided by your identity provider. This typically includes information about the IdP, such as its entity ID, SSO URL, and certificate. Use this option if your identity provider does not support hosting the metadata at a URL, is not accessible from the internet, or if you prefer to enter it manually.
Metadata URL: The URL where the SSO metadata can be retrieved. If provided, the Admin Portal will fetch the metadata from this URL instead of using the manually entered metadata contents.
Domains: A comma-separated list of domains that are allowed to use SSO for authentication. This is used to restrict SSO access to users from specific domains.
Roles: A mapping of the roles defined in your identity provider to the roles used in the Admin Portal. This allows you to assign appropriate permissions to users based on their roles in the IdP.
Tenants Settings: A mapping of tenant identifiers from your identity provider to the tenant names used in the Admin Portal. This is used to associate users with the correct tenant based on the information provided by the IdP.
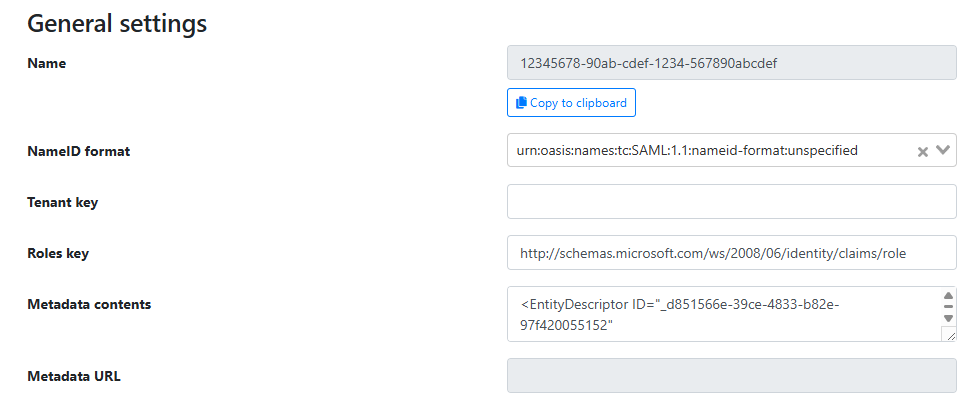
Example of the General Settings part of the SSO configuration page in the Admin Portal.

Example of domains configuration on the SSO configuration page in the Admin Portal.
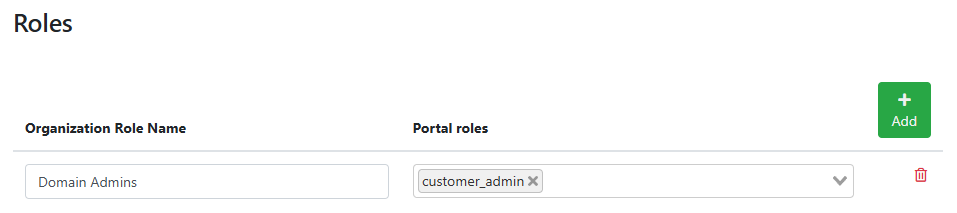
Example of roles mapping configuration on the SSO configuration page in the Admin Portal.
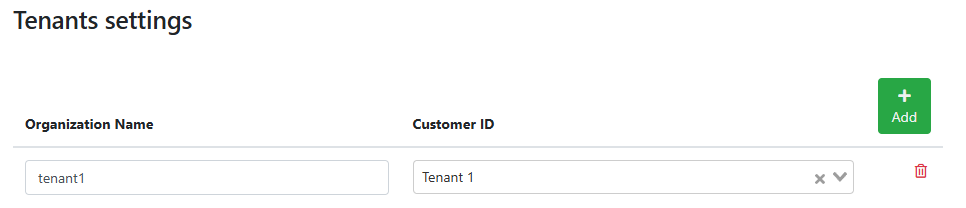
Example of tenants settings configuration on the SSO configuration page in the Admin Portal.
Admin Portal’s SSO URLs
When configuring your identity provider, you will need to provide the appropriate URLs for the SSO process. The Admin Portal uses the following URLs:
Authentication URL: https://login.whalebone.io/sso/<ssoid>/auth - This is the URL that users will access to initiate the SSO authentication process.
Metadata URL: https://login.whalebone.io/sso/<ssoid>/saml/metadata - This is the URL where the IdP can retrieve the SSO metadata.
Test URL: https://login.whalebone.io/sso/<ssoid>/test - This is the URL that can be used to test the SSO configuration. This URL displays the SAML response received from the IdP, which can be useful for troubleshooting and verifying that the SSO configuration is working correctly.
Note
The <ssoid> is a unique identifier for your SSO configuration, which you can find in the Admin Portal in the Name field after creating an SSO configuration.
Integration with Popular Identity Providers
Microsoft Active Directory Federation Services (ADFS)
Microsoft ADFS is a popular identity provider that supports SAML-based Single Sign-On. To integrate ADFS with the Admin Portal, you will need to create a new Relying Party Trust in ADFS and configure it with the appropriate settings, such as the SSO URLs and claims. You can use the SSO metadata URL provided by the Admin Portal to simplify the configuration process in ADFS.
Below is a high-level overview of the steps to integrate ADFS with the Admin Portal. Let’s start with adding a new Relying Party Trust in ADFS:
Open the ADFS Management console and navigate to “Relying Party Trusts”.
Click on “Add Relying Party Trust” to start the wizard.
Select “Claims aware” and click “Start”.
Download the SSO metadata from the Admin Portal using the provided Metadata URL and save it to a file on the ADFS server.
Choose “Import data about the relying party from a file” and enter the path to the saved metadata file. Click “Next”.
Warning
The “Import data about the relying party published online or on a local network” option is not available because the Admin Portal’s SSO requires at least TLS 1.2, but ADFS is struggling with this requirement.
Follow the prompts to complete the configuration, ensuring that you configure the appropriate claims to match the Name ID Format, Role key, and Tenant key settings in the Admin Portal.
Adding claims in ADFS is crucial for the SSO process to work correctly. You will need to add claims that correspond to the Name ID:
In the ADFS Management console, right-click the newly created Relying Party Trust and select “Edit Claim Issuance Policy…”.
Click on “Add Rule…” to create a new claim rule.
Choose “Send LDAP Attributes as Claims” and click “Next”.
Select the appropriate attribute store (e.g., Active Directory) and configure the claim rules to send the user’s user principal name (UPN) as the Name ID.
Create additional claim rules to send the user’s group memberships or other attributes as claims that correspond to the Role key and Tenant key settings in the Admin Portal.
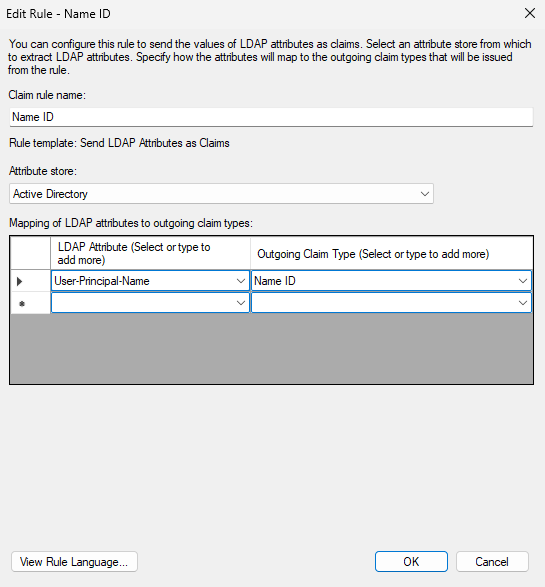
Example of ADFS claim rules configuration for Name ID.
Here are the instructions for adding claims in ADFS to match the Role key:
In the ADFS Management console, right-click the Relying Party Trust you created for the Admin Portal and select “Edit Claim Issuance Policy…”.
Click on “Add Rule…” to create a new claim rule.
Choose “Send LDAP Attributes as Claims” and click “Next”.
Select the appropriate attribute store (e.g., Active Directory).
Configure the claim rules to send the user’s Token-Groups Unquified Name (or another attribute that contains the user’s group memberships) as a claim that corresponds to the Role key in the Admin Portal.
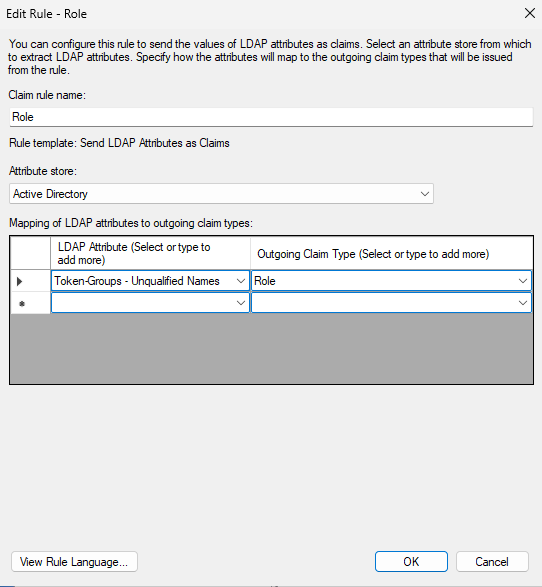
Example of ADFS claim rules configuration for Role key.
Optionally, you can also add claims for the Tenant key if you want to associate users with specific tenants in the Admin Portal based on their attributes in ADFS. The process is similar to adding claims for the Role key, but you would configure the claim rules to send an attribute that contains the tenant identifier.
The last steps is to finish the configuration in the Admin Portal by entering the appropriate values for the Name ID Format, Role key, and Tenant key fields to match the claims you configured in ADFS. The procedure is as follows:
In the Admin Portal, navigate to the SSO Settings page.
Set the NameID format to urn:oasis:names:tc:SAML:1.1:nameid-format:unspecified (or another format that matches the Name ID claim you configured in ADFS).
Set the Role key to the claim name that corresponds to the user’s group memberships (e.g., http://schemas.microsoft.com/ws/2008/06/identity/claims/role).
If you configured a Tenant key, set it to the claim name that corresponds to the tenant identifier (e.g., http://schemas.microsoft.com/ws/2008/06/identity/claims/tenant).
If the ADFS server is not accessible from the internet, you can download the metadata from the Metadata URL (e.g., https://<ADFS_SERVER>/FederationMetadata/2007-06/FederationMetadata.xml) and enter it manually in the Metadata contents field. If the ADFS server is accessible from the internet, you can enter the Metadata URL directly in the Metadata URL field.
Enter the domains that are allowed to use SSO for authentication (e.g., example.com).
Assign the appropriate roles in the Roles mapping section to ensure that users are granted the correct permissions in the Admin Portal based on their group memberships in ADFS.
Optionally, configure the Tenants Settings if you want to associate users with specific tenants in the Admin Portal based on their attributes in ADFS.
Save the SSO configuration and allow some time for the SSO endpoints to be created before testing the SSO authentication process.