Domain resolution analysis
There is always a chance that an administrator will encounter a situation where DNS resolution fails. Most of the time, it is not related to Whalebone’s resolver, but there is probably an issue with an authoritative server.
ISPs often face complaints that users cannot access the domain. In many cases, it is not the ISP’s fault. The Whalebone Admin Portal provides administrators with the information you need to identify the issue.
Troubleshooting consists of four steps:
Step 1: Examine if on-premises Whalebone resolvers block the domain
If you have on-premises resolvers, use the “Is this domain blocked?” button in the resolver menu, under the three dots icon. The test result will tell you whether the resolver blocks the domain. If it is blocked, you have three options: add the domain into an allow list, report it as a false positive detection, or leave it blocked.

Step 2: Examine the domain in the Threats page
Try to find the affected domain among blocked threats. Similarly to the previous option, if it is blocked, you have three options: add the domain into an allow list, report it as a false positive detection, or leave it blocked.
Step 3: Examine the domain in the DNS traffic
If the threat protection feature did not block the domain, go to DNS Traffic and check whether the request reached the resolver.
If you did not find any requests from the user’s IP address in the DNS Traffic overview, the user changed the DNS server configuration on their PC or home router to use public DNS servers. In that case, DNS requests are not sent to Whalebone, and Whalebone does not cause the issue with accessing the domain.
If you found the request in the DNS Traffic overview, you can face three cases:
The domain was translated correctly, and the issue is not caused by Whalebone.
NXDOMAIN was returned. It means that the authoritative server responded, but the domain or subdomain does not exist.
SERVFAIL was returned. It means no response was received from the configured authoritative server, or the authoritative DNS server does not have valid DNSSEC records for the domain. If this happens, proceed to Step 4.
Step 4: Examine the domain using the DNSVIZ tool
There is an arrow next to each domain that opens a menu where you can be redirected to DNSVIZ for that domain. DNSVIZ allows you to analyze the entire resolution process, including DNSSEC validation.
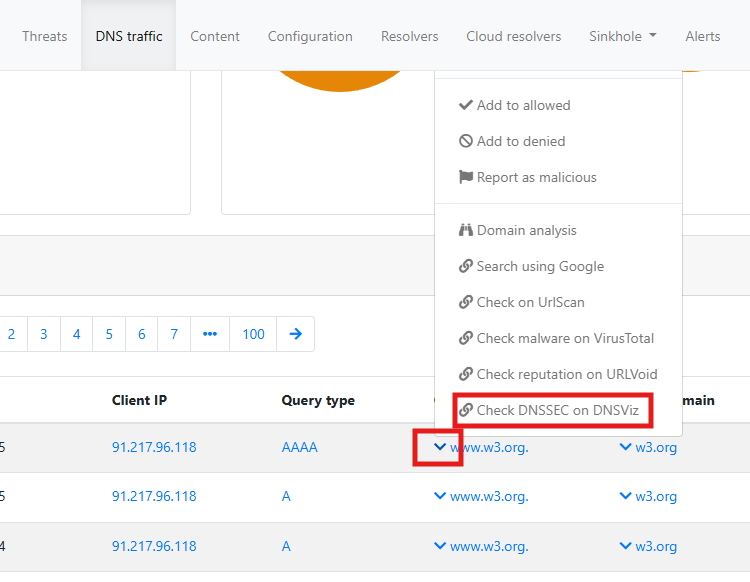
It can show that the DNSSEC validation process was unsuccessful or the authoritative DNS server was not reachable.
Step 5: Use the Developer Tools in the web browser to collect more details about the blocked domain
If the domain is not blocked, there are no obvious errors in DNS Traffic, and DNSVIZ shows that the domain is valid, you can use Developer Tools in your web browser to collect more details about the blocked domain. Look for errors in the Console tab and check the Network tab for failed requests. Eventually, you can save the network log and contact Whalebone Support for further assistance. See the Developer Tools guide for more information.
You can watch a step-by-step video guide here.
The Whalebone administration portal provides the ability to trace the domain. This feature is available in Resolvers under each resolver’s three dots. This feature shows what information is passed to the resolver when resolving a particular domain.
You can watch a step-by-step video guide here.
Developer Tools guide
The Developer Tools are built-in features of modern web browsers that allow users to inspect and debug web pages. They provide various tools for developers to analyze requests and domains involved in loading a web page. This chapter provides a brief overview of how to use Developer Tools to collect more details about network traffic and errors related to blocked domains in some popular web browsers. Once you have collected the network log, you can contact Whalebone Support for further assistance.
Tip
Delete the DNS cache on your computer and home router before using Developer Tools to ensure that you are capturing fresh DNS requests. You can clear the DNS cache on the computer by running the following command in the command prompt or terminal:
On Windows: ipconfig /flushdns
On macOS: sudo killall -HUP mDNSResponder
On Linux: The command may vary depending on the distribution and DNS service used. For example, for systems using systemd-resolved, you can use: sudo systemd-resolve –flush-caches
The router’s DNS cache clearing process varies by manufacturer and model. Refer to your router’s documentation for specific instructions. Restarting the router usually clears its DNS cache.
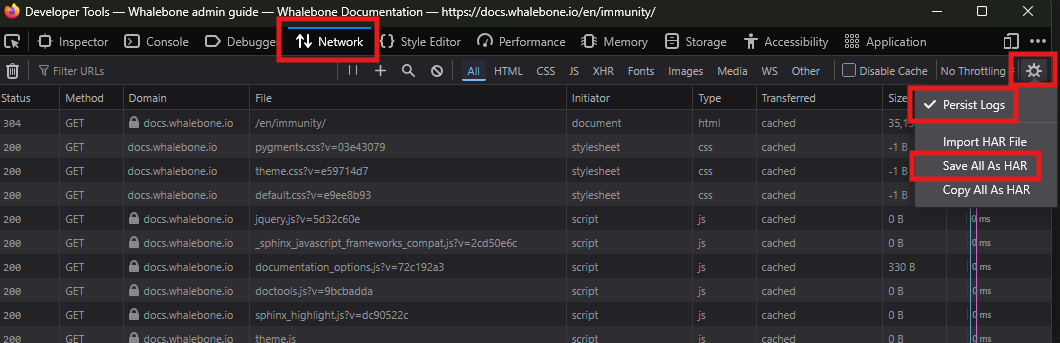
Google Chrome
Open Google Chrome.
Navigate to the web page where you are experiencing issues with accessing a domain.
Right-click anywhere on the page and select “Inspect” to open Developer Tools. Alternatively, you can press Ctrl + Shift + I (Windows/Linux) or Cmd + Option + I (Mac).
In Developer Tools, go to the “Network” tab.
Check the “Preserve log” option to keep the log of network requests even if the page is reloaded.
Reload the web page to capture all network requests. If for example, a video fails to play, load the page with the video and try to play it.
Save the network log by clicking the “Export HAR (sanitized)…” button located in the Network tab’s toolbar. This will save a HAR file containing all network requests and responses.
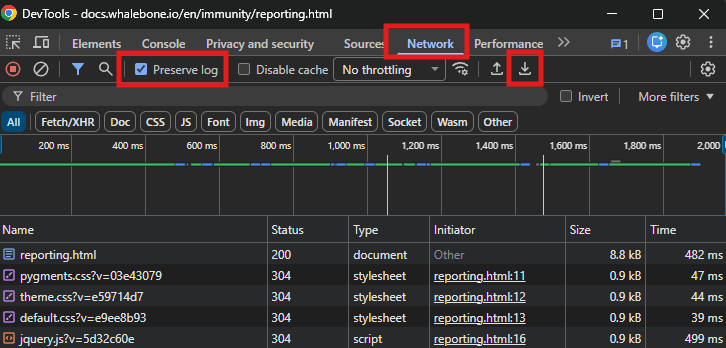
Mozilla Firefox
Open Mozilla Firefox.
Navigate to the web page where you are experiencing issues with accessing a domain.
Right-click anywhere on the page and select “Inspect Element” to open Developer Tools. Alternatively, you can press Ctrl + Shift + I (Windows/Linux) or Cmd + Option + I (Mac).
In Developer Tools, go to the “Network” tab.
Click the gear icon in the upper right corner and check the “Persist Logs” option to keep the log of network requests even if the page is reloaded.
Reload the web page to capture all network requests. If for example, a video fails to play, load the page with the video and try to play it.
Save the network log by clicking the gear icon in the upper right corner and selecting “Save All As HAR”. This will save a HAR file containing all network requests and responses.
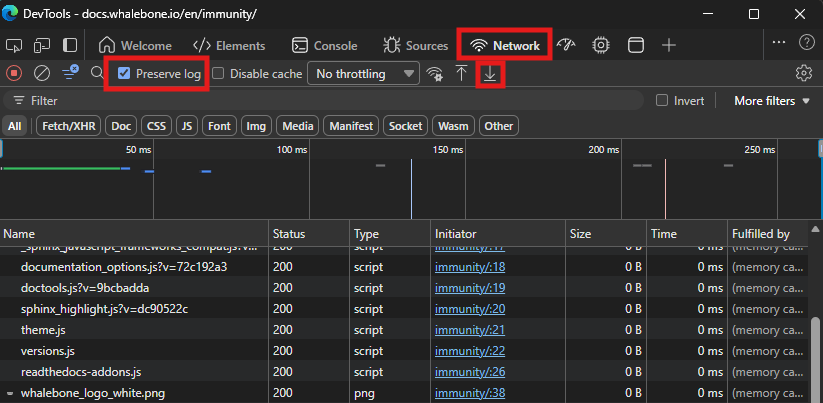
Microsoft Edge
Open Microsoft Edge.
Navigate to the web page where you are experiencing issues with accessing a domain.
Right-click anywhere on the page and select “Inspect” to open Developer Tools. Alternatively, you can press Ctrl + Shift + I (Windows/Linux) or Cmd + Option + I (Mac).
In Developer Tools, go to the “Network” tab.
Check the “Preserve log” option to keep the log of network requests even if the page is reloaded.
Reload the web page to capture all network requests. If for example, a video fails to play, load the page with the video and try to play it.
Save the network log by clicking the “Export HAR (sanitized)…” button located in the Network tab’s toolbar. This will save a HAR file containing all network requests and responses.